How to Extract Data from Graph Image for Free?

Graphs and charts are visuals that show the relationship between different measurements. We all rely heavily on graphics to represent our data and research to our audience. For example, a sales manager would represent the company’s sales in bar charts, or a scientist often concludes their experimental results in scientific visuals.
However, sometimes individuals, instead of plotting data, might want to reserve-engineer graph images. And it is not an effortless process unless you are using the right tool.
PlotDigitizer is a simple but very effective tool for extracting data from graph images. It has many in-built features that ease data extraction. The software has a free online app, which is competent enough for data extraction. For high functionalities, you need to upgrade to the pro version. You can try the free online app here.
PlotDigitizer supports several types of graphs, that includes, XY, bar, column, pie/doughnut, polar, ternary, maps. Besides graphs, you can calculate the distance, angle, and area of the portion on the image.
Extracting data from graph image
In the following text, we will take an example to explain how to use PlotDigitizer.
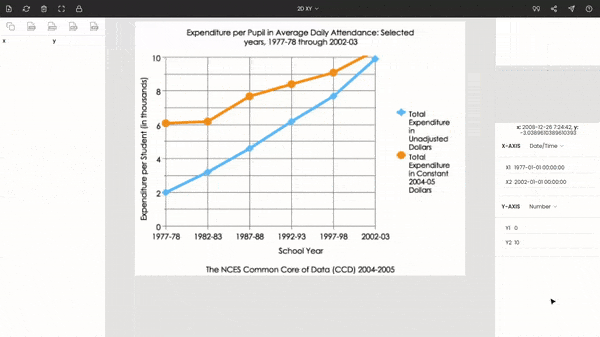
The graph below displays the expenditure per pupil (in thousands) from 1977 to 2002.
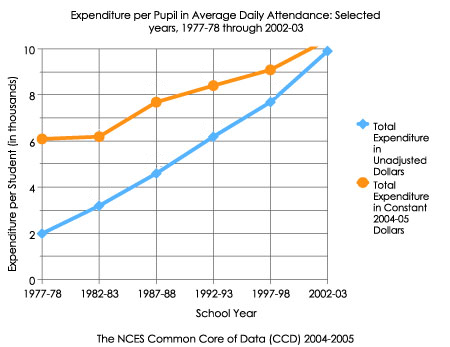
There are two plots in the figure; the first is for expenditure with the unadjusted dollar (in blue), and the other is for the adjusted dollar as of 2004–05 (in orange).
We can extract the data from the graph by following simple steps:
Step 1: Upload the image to PlotDigitizer
Go to PlotDigitizer’s free online app, and upload the image by clicking or drag-dropping.
PlotDigitizer accepts several image formats, so you will probably not have any support issues. The preferred image files are PNG, JPG, SVG, GIF, TIFF, and BMP.
If you have a pro version of PlotDigitizer, then you can crop out unnecessary portions of the image using the image editing tool kit. For example, in the above image, the legend and the title are unnecessary for data extraction and could be removed. Further, you can adjust the image with a rotation tool or increase/decrease the size of the image with the scale tool.
Step 2: Select the graph type
After uploading, you have to select the graph type; in our case, it is XY, which is the default selection.

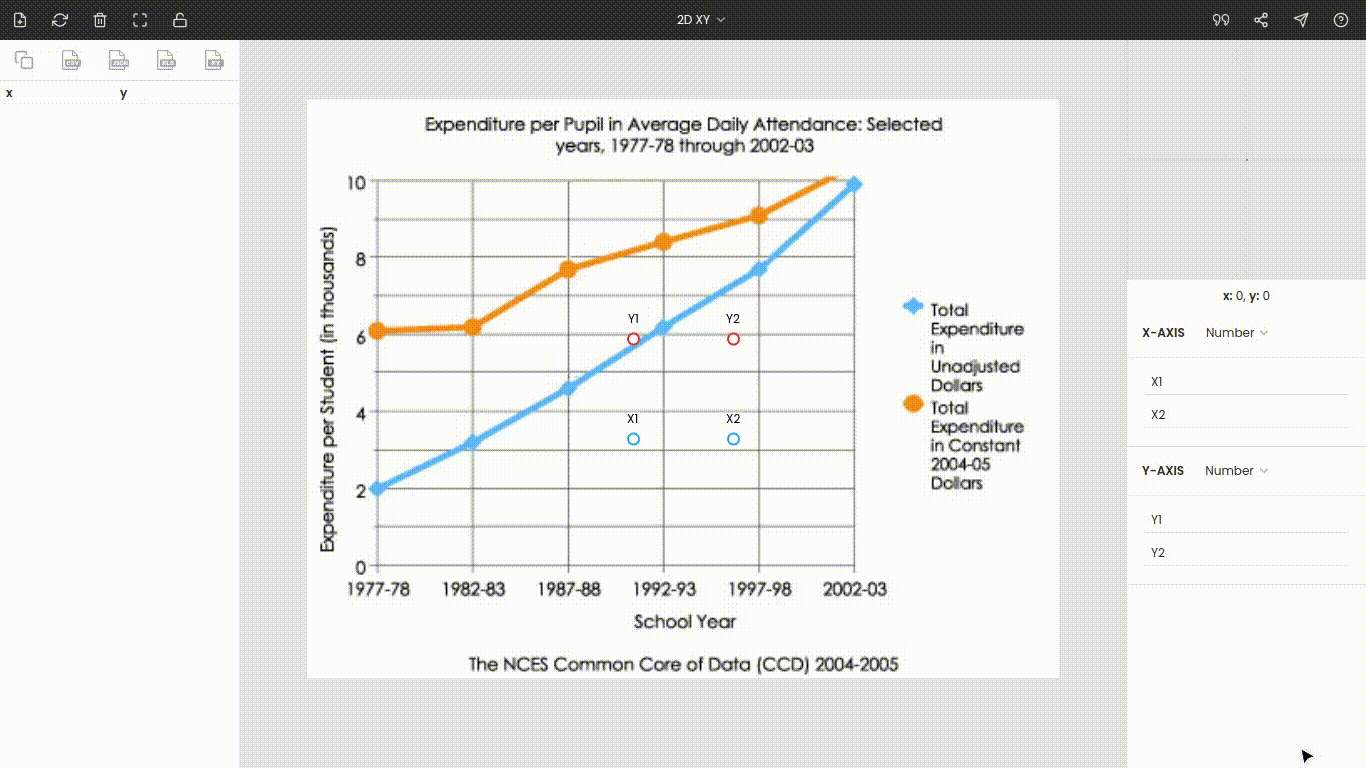
Step 3: Calibrating the axes
It is an XY plot, so you have to calibrate two axes. Drag and drop all the four points (x1, x2, y1, and y2) to the extremes of the plot. Here, x1 and x2 are moved to 1977 and 2002, while y1 and y2 are dragged and dropped to 0 and 10.
You do not necessarily have to move to the extremes though it is recommended since it increases the accuracy of the calibration.
The zoom panel (or magnifier) on the top-right side helps you to improve the accuracy while selecting and dropping the points.
The y-axis is linear, while the x-axis is the date scale. So, change the x-axis scale to date and insert the values of the points (y1 = 0, y2 = 10, x1 = 1977-01-01 00:00:00, x2 = 2002-01-01 00:00:00). Remember the dates are inserted in yyyy-mm-dd hh:mm:ss format. If you are using the pro version, then there will be a date and time picker to achieve this.
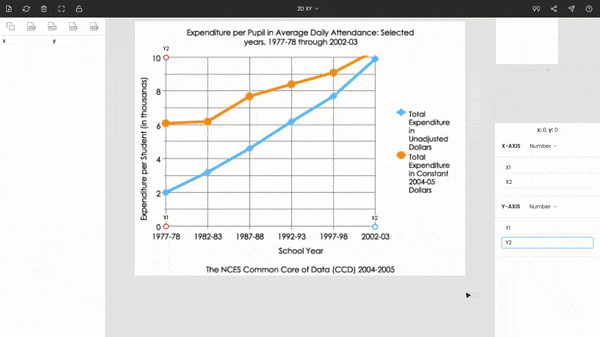
You can hide the points by clicking the lock icon located somewhere on the top of the window.
Step 4: Extracting data points from the plot
Once the axes are calibrated, start marking points on the curves to record data points. You can see the values on the side panel.
Further, you can edit, sort, or modify the values.
Step 5: Exporting the extracted data
In the end, the extracted data can be exported in various formats, e.g., CSV, JSON, MatLab, Python array, MS Excel.